Five Obscure Mac Keyboard Shortcuts
Yes, it’s a list post, with a prime number of items, to boot. Sue me.
Here’s five of the more obscure Mac keyboard shortcuts I use, plus some bonus tips for good measure. If you know about all of them already, you’re probably really über-geeky (umlaut tip: hit Option‑U to prepare an umlaut; it’ll then appear over then next character you type.)
Changing Sound Input and Output Devices
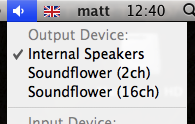
 Useful for the audio hackers out there: since Snow Leopard, you’ve been able to change sound input and output sources really easily by holding down Option (Alt) when you click on the speaker icon in the menubar. Before OS X 10.6, you’d have had to install Rogue Amoeba’s handy SoundSource freebie to get the same functionality.
Bonus menubar tip: Holding down Option will also get you extra information from the Bluetooth and WiFi icons. Connected to WiFi at the moment? Hold Option and click the antenna icon, and you’ll see some extra-geeky information about your connection.
Fine-Tune Your Volume Control
Continuing on the audio theme, ever wanted to fine-tune your volume output? Hold down Option+Shift at the same time as hitting your volume up/down buttons on the Apple keyboard, and you’ll find you get far more fine-grained up/down steps. This may be a Snow Leopard-only tip, too; I can’t remember when the feature first appeared.
Bonus audio control tip: Holding Option while hitting your Volume Up button will open up Sound Preferences.
Boolean Spotlight Search
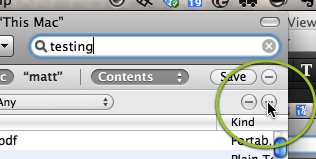
 So, you’re searching for something in a Finder window, using the little Spotlight search, top right. And, being a hardcore geek, you don’t want just the vanilla search, no, you want a complicated Boolean search. So, again with the Option key. When you’re adding criteria, hold down Option. The little plus symbol turns into an ellipsis, and clicking it kicks off a new group of search parameters. You can choose to match on “Any”, “All” or “None” of the group criteria being true.
Bonus tip: Hitting Command+Option+F will drop your keyboard focus straight into the Search box in both Finder and Safari.
iTunes Podcast Lists
 If you’re a heavy podcast listener, you probably spend a fair bit of time in the Podcast list in iTunes. But did you know about these two tricks? Both of these work on the little triangle icons that appear next to the main entry for each podcast, to expand and collapse the list of downloaded episodes.
First off, try holding Command down when you click on one of the little triangles. The episode list will expand or collapse as normal, but so will the episode list of every other podcast you subscribe to. Very handy for tidying up the view in one easy step.
Next, find a podcast that you’ve been listening to for a while. Expand the episode list. You’ll probably see just the episodes that you’ve currently got downloaded and ready to listen to. Collapse the list, then expand it again, this time with the Option key held down. This will expand the list as normal, but after a second or two to query the podcast feed, iTunes will show you every episode in the feed, whether you’ve downloaded it or not. This really speeds up checking for and downloading episodes you might’ve missed.
Bonus iTunes tip: In current versions of iTunes, hitting the little green “maximise” button at the top of the iTunes window toggles iTunes into a miniature “playback controls” window, the “mini player”. If you actually want to maximise/restore the window, as the button normally does, hold down Option while you click it. This is exactly the reverse behaviour of older iTunes versions, where Option+clicking the maximise button would show the mini player.
Quitting Apps From the Command+Tab List
This may be a little less obscure, but there’s still plenty of people who don’t know about it.
Most people are familiar with switching between apps using the task list that pops up when you hit Command+Tab. But did you know you can do other things than just switch to the application? Hit Command+Tab, then, keeping Command held down, tab to an app. At this point, where you’d normally let go of Command to switch to the app, instead hit “Q” (still keeping Command held down.) That’ll quit the app, without switching to it. “H” instead of “Q” will Hide/Unhide rather than quitting. Since Snow Leopard, hitting the up or down arrow keys will fire up Exposé on the selected application, too.
Oh — and don’t forget that Command+Shift+Tab will cycle backwards through the list of applications, and Command+‘ (backtick) will cycle through the open windows of the current application.
Bonus mouse tip: If you’ve got a big list of applications in your Command+Tab “task switcher”, you don’t actually have to cycle through them using the keyboard. Once you’ve brought up the task list with Command+Tab, again, keep the list on the screen by keeping Command held down. Then just click your mouse on any of the app icons to switch directly to it. This can sometimes save you some fiddly switching-through-apps work.
Any More?
That’s my five. Do you have any off-the-beaten track Mac keyboard tips? Feel free to comment…
1 Comment
All Those Keys » Blog Archive » I Don’t Have Enough To Say
August 22, 2010[…] In fact, I just started doing that, with a post on Five Obscure Mac Keyboard Shortcuts. […]